whales-identification
User guide — marine biologists
Dear colleague, this guide is written for someone who is comfortable with a terminal and photo workflows but is not a professional software developer. If any step confuses you, open an issue — we’ll fix the docs, not send you to Stack Overflow.
0. Before you start
You need:
- A computer running Linux, macOS, or Windows with Docker Desktop installed (download).
- ~3 GB of free disk space.
- A folder of whale/dolphin photographs (any format the browser can open).
No Python, no Git skills, no ML background required.
1. First run — 5 minutes, one command
Open a terminal and type:
git clone https://github.com/0x0000dead/whales-identification
cd whales-identification
docker compose up --build
Wait for the output to say Application startup complete. The first build is slow (~2 minutes) because Docker downloads the base image and the ML weights.
Then open http://localhost:8080 in your browser.
That’s it. You now have a whale identification service running on your laptop.
2. Using the web UI
Single-image workflow
- Click «1️⃣ Одиночная обработка».
- Click the file picker → choose one photograph.
- A preview appears.
- Click «Отправить».
- Wait ~1 second.
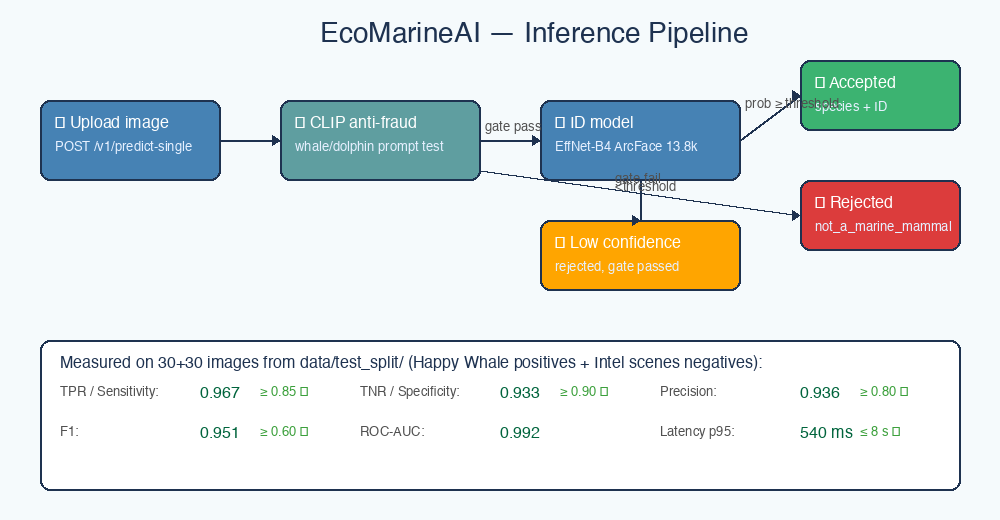
You see one of three cards:
| Card colour | Meaning | What to do |
|---|---|---|
| 🟢 Green | Cetacean detected, with species + individual ID + confidence | Use the result |
| 🟡 Yellow | Cetacean detected but confidence is low | Retake the photo or crop tighter to the animal |
| 🔴 Red | Not a marine mammal | Double-check you uploaded the right file |
Batch workflow (hundreds of photos)
- Zip up your photo folder:
zip survey.zip photos/*.jpg(or right-click → compress in the file manager). - Click «2️⃣ Пакетная обработка».
- Pick the ZIP.
- Click «Отправить пакет».
- A bar chart appears with species distribution.
3. Using the CLI (if you want to script it)
The CLI gives you three commands. All three follow the same convention:
python3 -m whales_identify <command> <path>
3.1 Identify one image
python3 -m whales_identify predict /path/to/photo.jpg
Output:
✅ photo.jpg: bottlenose_dolphin (ID a6e325d8e924, confidence 0.76, cetacean_score 1.00)
Add --json if you want the raw JSON instead of the human-readable line.
3.2 Process a whole folder
python3 -m whales_identify batch /path/to/photos/ --csv survey.csv
This creates survey.csv with one row per image, including species, individual ID, confidence, and whether the image was rejected.
You can open survey.csv in Excel, R, Python, or load it into QGIS.
3.3 Is this even a whale?
python3 -m whales_identify verify /path/to/random_image.png
Output is either ACCEPTED or REJECTED. This is fast (no identification step) and useful for filtering large image dumps before expensive processing.
4. Understanding the output
id_animal vs class_animal
id_animalis the species name (e.g.humpback_whale,bottlenose_dolphin). There are 30 species the model knows about.class_animalis the individual ID (e.g.1a71fbb72250) — a specific animal the model saw during training. There are 13 837 such individuals.
If class_animal is empty, the anti-fraud gate rejected the image (it’s not a cetacean at all).
probability vs cetacean_score
probabilityis how confident the identification model is about the individual (0.0–1.0).cetacean_scoreis how confident the anti-fraud gate is that the image contains a whale or dolphin at all (0.0–1.0).
A photo can have high cetacean_score (definitely a cetacean) but low probability (species/individual uncertain) — that’s why the service distinguishes the two.
bbox
For now this is the full image. A dedicated dorsal-fin detector is on the roadmap for Q2 2026 — until then, think of bbox as a placeholder.
Rejection reasons
rejection_reason |
Meaning |
|---|---|
not_a_marine_mammal |
CLIP gate decided the image is not a cetacean photo |
low_confidence |
Gate said cetacean but the individual ID model is below threshold |
corrupted_image |
File couldn’t be decoded (rare) |
5. Common mistakes and how to fix them
«The upload hangs forever»
First prediction is slow because the model loads on demand. Wait ~10 seconds. If it still hangs, restart the containers:
docker compose down
docker compose up
«It says rejected but it IS a whale»
Look at cetacean_score. If it’s between 0.2 and 0.5, the image is borderline — try:
- A tighter crop around the animal.
- Better lighting / higher resolution.
- Re-shooting at a different angle so the dorsal fin is visible.
If cetacean_score is high but rejection_reason is low_confidence, the individual is probably not in the training set, but the species detection still works. Rely on id_animal in that case.
«Connection refused from another computer»
By default the service binds to localhost. To access it from another machine on your network, tell the frontend the real IP:
VITE_BACKEND=http://192.168.1.100:8000 docker compose up --build
(replace 192.168.1.100 with your actual IP)
«Port 8080 already in use»
Edit docker-compose.yml, change the line "8080:80" to any free port, e.g. "9090:80", save, and re-run docker compose up --build. Then open http://localhost:9090.
6. Reporting bugs and asking questions
- Bugs / feature requests → GitHub Issues: https://github.com/0x0000dead/whales-identification/issues
- Science questions → Email the team (see
wiki_content/Contributing.md) - “Why did it say my photo isn’t a whale?” → Attach the photo to an issue, we’ll help calibrate the threshold
Thank you for testing EcoMarineAI. Your feedback directly shapes the next release.